
Webshopper Training
Occurs the 1st and 3rd Tuesday of each month at 2:00 pm EST
Webshopper Training consists of the basic overview of the site. This training is a set presentation where you can ask questions as we move through each section of the site.
- Search
- Cart
- Saved Cart
- Favorites
- My Orders
- Standards
- Requisitions
- Profile
- Returns
Organization Admin Training
Occurs the 2nd and 4th Tuesday of each month at 2:00 pm ESTThe Organization Admin Training will be based on the customers on the call. At the beginning of this call you will be asked what you would like accomplish from a list of administration functions we offer. From the responses given the training will be formed. This can consist anywhere from setting up your users to setting up approval processes for your company.
Webinar Information
Meeting ID: 7935
Meeting Password: none
Phone Number(s): 800-444-4033
TO ATTEND THE WEB CONFERENCE AND THEN JOIN WITH AUDIO:
- Go to: http://meetme.mcpc.com no sooner than 10 mins before training session. Attend meeting 7935.
-
Sign in as a Guest or with your Cisco MeetingPlace User ID, and click on Attend
Meeting.
- Accept any security warnings you receive and wait for the Meeting Room to initialize. - Click on CONNECT and enter your phone and click OK. The system will now call you.
Help Document Sections:
- Search
- Default Screen
- My Cart
- My Saved Carts
- My Quotes
- Check Out
- My Favorites
- My Orders
- Standards
- Requisition Items
- My Profile
- Submit Return
- Toner Recycling
- Order Reports
- Order Invoices
-
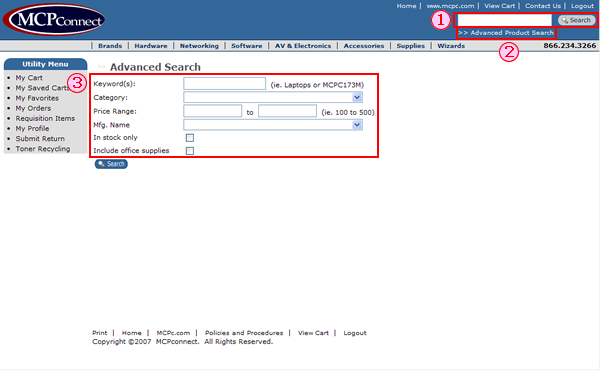
Standard Search
The standard search searches the manufacturer field, part number field and description field. By default the results will display only results that match all words in the keyword search field and will automatically wildcard the end of each search term.
Example: Wireless Bluetooth Adapter
Results will only display the results where "Wireless" "Bluetooth" and "Adapter" are all found in the product fields.
(Wildcard - used for matching terms with the same prefix, root or suffix.) -
Advance Search Link
This link will take the end user to the advance search page. -
Advance Search Details
Here the end user can narrow down there search by using filters. They can narrow down by keywords entered, Category of Product, Price Range, Manufacturer Name, showing in stock items only and showing office supplies. -
Search Filters
When the end user uses the search function, they will see a search filter on the left side. This is used to narrow down the search results.
Example: Wireless Bluetooth Adapter
They now have the option to narrow down the results by Category, Manufacturer, and Price.
These results may change depending on what results are fetched.
-
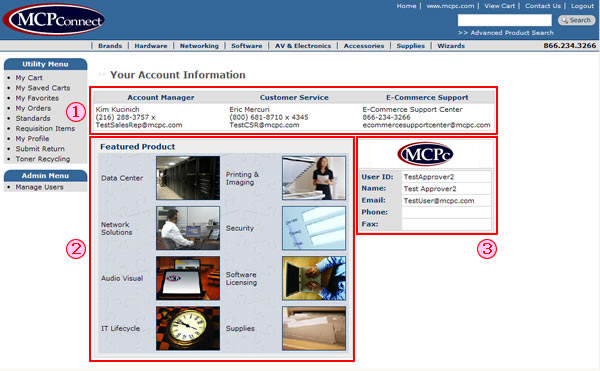
Your Account Information
This area contains your MCPc contacts, you will find the Name, Phone Number and Email Address for your Account Manager, Customer Service Rep and E-Commerce Support. This information can only be changed by MCPc. -
Featured Product
This area contains a quick link to Featured Products for all the Practices which MCPc specializes in. -
User Information
This area contains user specific profile information that is in the MCPconnect Database. Here you will find you Company logo, if on file, your User ID to log onto MCPconnect, your Name, Email and Phone numbers. To change any of this information you will need to use the My Profile section.
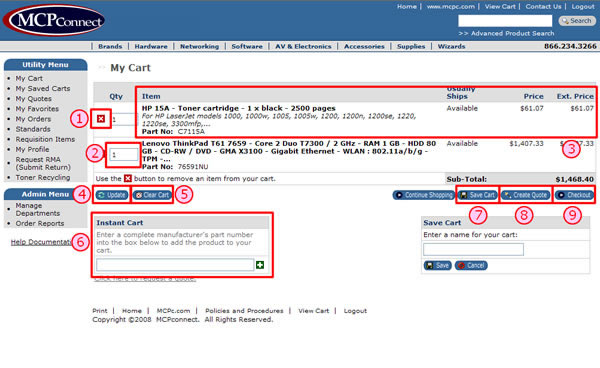
- Remove/Delete Item
- Qty Change
- Item Usually Ships, Price, Ext. Price
- Update
- Clear Cart
- Instant Cart
- Save Cart
- Create Quote
- Checkout
-
Remove/Delete Item
Use this button to remove a line item from your cart. The page will automatically refresh once clicked. -
Qty Change
Here you have the ability to change the item quantity of the line item. Simply change the quantity to the desired amount and click 'Update'. -
Item, Usually Ships, Price, Ext. Price
Here is detailed information about the items in the cart. Click on the Item Description in the line item to get further detail on the item.
Usually ships gives an approximate of when the item will ship.
Price is the price on an individual unit of the product.Available: This product is readily available from MCPc distribution facilities and normally ships in 1-2 days.
1-2 Weeks: This is an active product but not in stock from MCPc distribution facilities. Normally this product will ship within 1-2 weeks.
Call: This product may not be available. Please call your MCPc representative.
Extended Price is the price times the quantity ordered. -
Update
Once the quantity is changed click on 'Update' to update the cart. -
Clear Cart
This function completely clears out the entire current cart. -
Instant Cart
This function allows the end user to add an item directly to the cart if they know the exact part number of the item. Add the part number into the textbox and click the green plus button. -
Save Cart
This function allows the end user to save the current cart for future use. Click on 'Save Cart', a new box will appear at the bottom of the cart. Enter a name for the saved cart and click 'Save'. For more information see My Saved Cart. -
Create Quote
This function allows the end user to make a quote for internal purposes off the current cart. For more information see My Quotes. -
Checkout
This function brings the end user to the checkout process. For more information see Check Out.
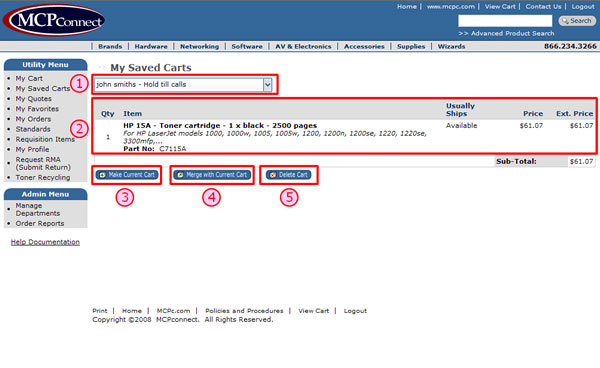
- Select Saved Cart
- Item Usually Ships, Price, Ext. Price
- Make Current Cart
- Merge with Current Cart
- Delete Cart
-
Select Saved Cart
This dropdown list is used to choose which saved cart the end user would like to pull up. -
Item Usually Ships, Price, Ext. Price
Here is detailed information about the items in the cart. Click on the Item Description in the line item to get further detail on the item.
Usually ships gives an approximate of when the item will ship.
Price is the price on an individual unit of the product.Available: This product is readily available from MCPc distribution facilities and normally ships in 1-2 days.
1-2 Weeks: This is an active product but not in stock from MCPc distribution facilities. Normally this product will ship within 1-2 weeks.
Call: This product may not be available. Please call your MCPc representative.
Extended Price is the price times the quantity ordered. -
Make Current Cart
This function will turn the current saved cart into the current cart. Please note that if you have items already in the Cart this function will over ride those items. -
Merge with Current Cart
This function will merge the current saved cart with the items that are in the current cart.
Example:
Current Cart has 2 of C4127X
Saved Cart has 4 of 87654
Once 'Merged with Current Cart' is click the Current Cart will have all the above items. -
Delete Cart
This function will permanently delete the currently selected saved cart.
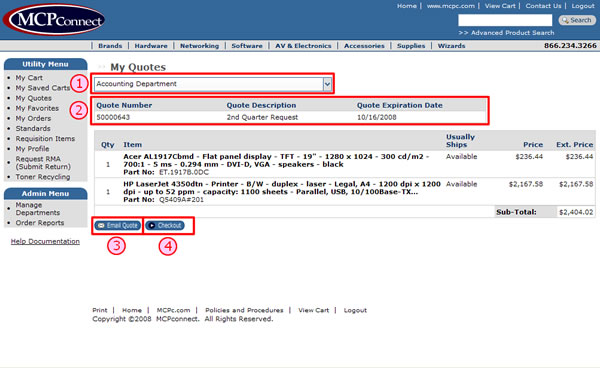
- Select Existing Quotes
This is a drop down box that allows the end user view all the existing quotes that they currently have. All quotes are active for 30 days, then disappear from the list. To view the list in the drop down, click on the down arrow to the right of the text and select the quote to be viewed. - Selected Quote Information
Once a quote is selected from the drop down list, the end user can see the quote information (Quote Number, Quote Description, Quote Expiration Date) for the selected quote. - Email Quote
This feature gives the end user the ability to Email their quote to others. Click on the 'Email Quote' button,a new box will appear with all the email options.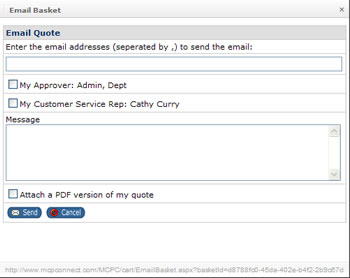
- Checkout
This feature gives the end user the ability to change a quote into an order. Once the correct quote is selected click on the 'Checkout' button. The quote will then convert to the checkout process. For more information on the checkout process see Check Out.
- Shipping Information
- Select Payments
- Payment Information - Account
- Payment Information - Credit Card
- Checkout Summary
- Order Confirmation
-
Shipping Information
Here the end user will choose where the purchase will be shipped to.
If the end user has edit rights, they may have the ability to 'New'. When a new shipping address is created it will automatically be added to the select dropdown list.
To proceed with the order the end user must select an existing shipping address from the dropdown list and select shipping method from dropdown list.
The end user may then choose to override an attention to and any special shipping instructions.
Click 'Continue' to continue. -
Select Payments
Here the end user will see all the payment methods that they have the ability to purchase with. If the end user only has one payment method, this page will be skipped and directed to the Payment Information screen. -
Payment Information - Account
This payment option is used when the end user will make their purchase with their MCPc account.
If the end user has edit rights, they may have the ability to 'New'. When a new billing address is created it will automatically be added to the select dropdown list.
To proceed with the order the end user must select an existing billing address from the dropdown list.
The end user may then choose to enter a PO number and/or Cost Center number to reference on their order.
Click 'Continue' to continue . -
Payment Information - Credit Card
This payment option is used when the end user will make their purchase with their credit card.
If the end user has edit rights, they may have the ability to 'New'. When a new credit card is created it will automatically be added to the select dropdown list.
To proceed with the order the end user must select an existing credit card from the dropdown list.
The end user may then choose to enter a PO number and/or Cost Center number to reference on their order.
Click 'Continue' to continue. -
Checkout Summary
Here the end user can review their order for any final changes. This area shows the Billing Address, Shipping Address, Shopping Cart, Purchase Order/Credit Card Information and Order Totals Summary. Under the Billing and Shipping areas are 'Change' links where the end user can make any necessary changes.
The end user can also enter additional email addresses that they wish to have copied on the emailed Order Confirmation.
Once the order has been completely review click 'Submit' to continue. -
Order Confirmation
This is a copy of the order confirmation. Once the order has been confirmed the order can not be altered. If for some reason you must cancel or change, please contact your customer service rep located on the 'Contact Us' page.
-
What are Favorites
Favorites are user specific. Favorites can only be seen and maintained by the end user that is logged in. My Favorites is a centralized area for the end user to easily store their commonly purchased products into organized folders. The end user can add to their favorites throughout the site. -
How to Add Favorites
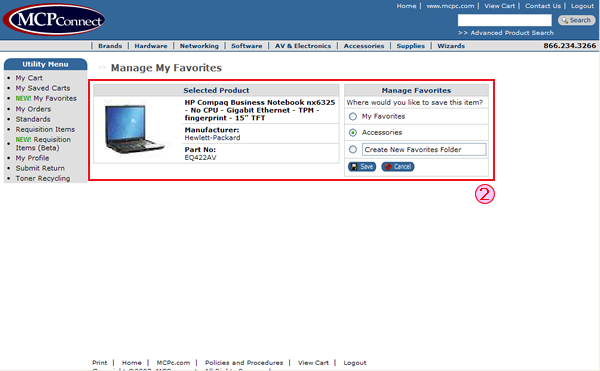
When products are listed the end user will see an, add to My 'Favorites' button under the, add to 'Cart' button. Once the end user clicks the 'Favorites' button, the end user will be taken to the 'Manage Favorites' page.
Here is where the end user can decide how to they would like to organize their favorites. On this page the end user will see the item that will be added to favorites, ‘Selected Product’ and an area to manage the placement of the item. ‘Manage Favorites’. Using the ‘Manage Favorites’ area the end user can select what folder the product will go into or create a new one. This is done by selecting the radio button next to the name of the folder and clicking the ‘Save’ button. The end user will then be brought to the Favorites. -
How to View Favorites
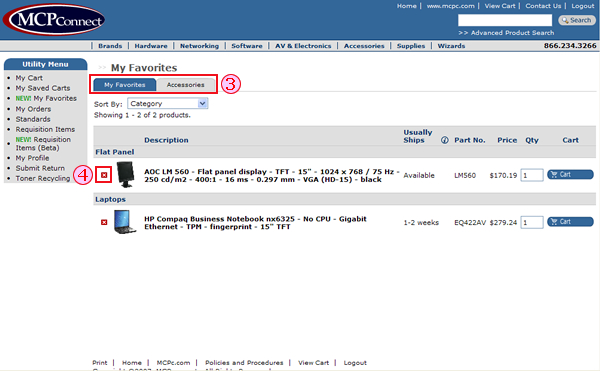
The Favorites can be seen by clicking the ‘My Favorites’ on the left Utility Menu or once a product is added from the Manage Favorites Page. Here the end user will see the folders at the top of the page and be able to navigate through them by clicking theirs folder titles. -
How to Delete Favorites
Items can be removed from a folder by click on the red X to the left of the item. Once all items have been removed from a folder the folder is no longer visible from this page. The folder will still be available for additions on the Manage Favorites Page.
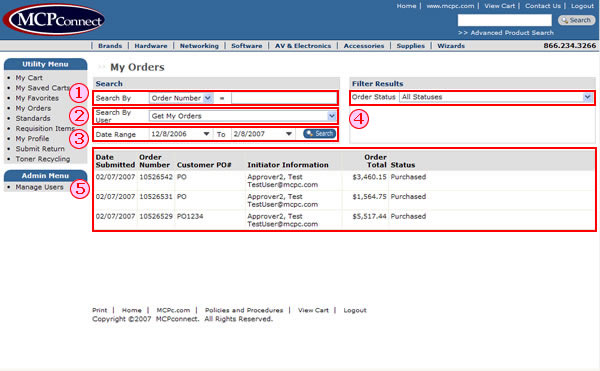
- Search By
- Search By User
- Date Range
- Filter Order Status
- Data Results
- Order Confirmation (with link to Invoices and tracking information)
-
Search By
Gives the end user the ability to search for orders by either the Order Number or Customer PO Number. If the end user is only assigned web shopper access on MCPconnect, they can only see orders that they entered. -
Search By User
This search function is only visible to end users assigned as a company administrator on MCPconnect, it gives the end user the ability to search for orders by:
Get My Orders - Orders the end user entered
Get Organization - All orders entered by the Organization
Orders Get Department Orders - All orders entered by the specific Department
Users - All Orders by a specific end user -
Date Range
Gives the end user the ability to search order within a specific date using a start date and end date range. -
Filter Order Status
The filter order status allows the end user to filter down the searched orders by the following statuses: All Statuses
Awaiting Approval
Purchased/Approved
Shipped
Completed
Cancelled
Rejected -
Data Results
After the search is complete the data results are shown at the bottom of the page. The end user has the ability to sort the results by clicking the header of each column. -
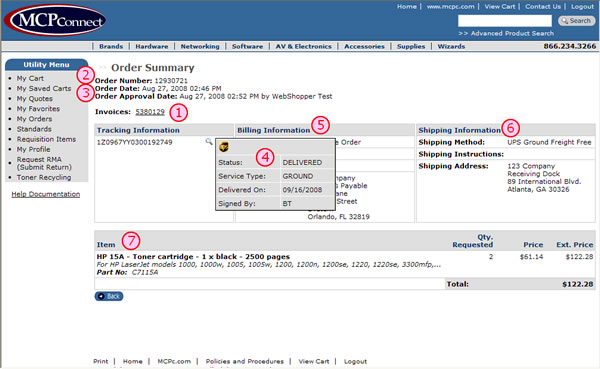
Order Confirmation
The end user can see the order confirmation if they click on the order number of the order they would like to see. Here the end user will access to:
1 - Invoice - Link to PDF format. Invoice will only show once the order has shipped
2 - Order Number - MCPconnect assigned order number
3 - Order Date - Date the order was placed on MCPconnect
4 - Tracking Information - Shows the tracking number(s) of the order , hover over the magnifying glass to see your live tracking information
5 - Billing Information - Shows where the invoice will be sent
6 - Shipping Information - Shows where the purchase will be sent
7 - Order Information - Shows all the products information from the order
- How To Get Them
The end user must be set up as an administrator to have the ability to run reports. They can get to the reports area by either using the Admin Menu on the left side of the screen or by using the 'Order Reports' link at the top of the 'My Orders' page. - Load An Existing Report
Once the end user gets to the 'Order History Reports' screen, they can either load an existing report or make a new report. To load an existing report that was saved previously by the signed in end user. Simply pick a report from the drop down list and click the 'Load' button.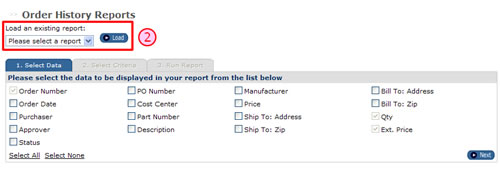
- Select Data
If the end user is starting a new report they will need to start with the 'Select Data' Tab. Select the data to be displayed in the report from the list of checkboxes. Once all desired fields are selected click the 'next' button. This will take the end user to the next step.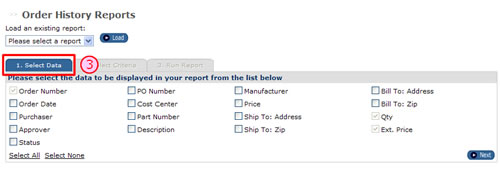
- Select Criteria
Now the end user can select the criteria of the their report by using the 'Select Criteria' Tab. Here they can choose a date range of the report, search by Order Number, Customer PO Number or by users: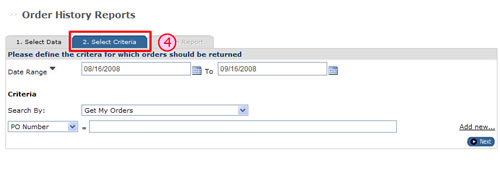
Get My Orders - Orders the end user entered
Get Organization - All orders entered by the Organization
Orders Get Department Orders - All orders entered by the specific Department
Users - All Orders by a specific end user
Once all the criteria is filled out the end user will need to click the 'Next' button to continue. - Run Report
Once the end user gets to this page the report will automatically be run on the page for them. The end user can also Group Columns of the report by selected the column from the 'Group By' drop down list. They then have the option to save the queried report for future use, overwrite the new report over an existing report or export it to an CSV file.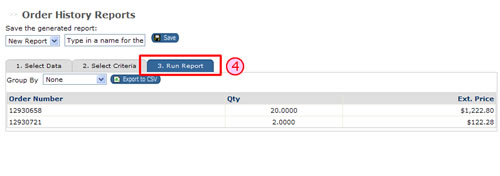
To save the report as a new report, simply have 'New Report' selected from the drop down list, type in a name for the report into the text field and click the 'Save' button.
To overwrite an existing report, pull down the name of the report you would like to overwrite on in the drop down list and click the 'Save' button.
To export the report, click the 'Export to CSV' button. The end user will then be prompted to save or run the file on their computer.
-
How To Use Standards
Standards are a company’s corporate IT product standards and typically represent customized systems and solutions. They are set up company wide and can only be changed by the MCPconnect customer service team.
The standards page may have multiple tabs at the top to enter different sections of the standard. Once the end user has picked a tab they can pick the product(s) that they would like to purchase.
-
How To Use Requisition Items
Requisition items work the similar to My Favorites. It is an area where the entire company has access to a list of product. They are set up company wide and can only be changed by the MCPconnect customer service team.
The requisitions page may have multiple tabs at the top to enter different sections of the requisition. Once the end user has picked a tab they can pick the product(s) that they would like to purchase.
-
Personal Information
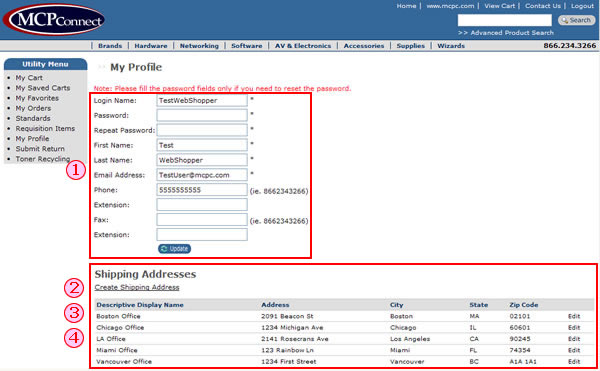
A user name and password are required to log on to MCPconnect. This area gives the end user the ability to change their Login Name, Password or Personal Information. The Login Name must be a unique name in the MCPconnect system. The Password field will not show the current password for security purposes.
* Only fill in the Password and Repeat Password section if you are planning to reset your password. -
Shipping Addresses
This area will show all the shipping addresses that the end user has access to ship to. If the end user has edit rights, they may have the ability to 'Create Shipping Address' or 'Edit' an existing address. -
Billing Address
This area will show all the billing addresses that the end user has access to bill to. If the end user has edit rights, they may have the ability to 'Create Billing Address' or 'Edit' an existing address. -
Credit Cards
This area will show all the credit cards that the end user has access to use for purchases. If the end user has edit rights, they may have the ability to 'Create Credit Card' or 'Edit' an existing credit card.
- MCPc Returns Policy
- Returns RMA Process
- Shipping
- Shipping Damage
- Shipping Damage Assessment Requirements
- MCPC Shipping Errors
- Supplies: Non-Defective
- Supplies: Defective
- Hardware/Software: Non-Defective
- Hardware/Software: Manufacturer Restrictions
- Hardware/Software: Defective/DOA
-
MCPc Returns Policy
* All returns are subject to manufacturer and vendor terms, whichever takes precedent.
* If an item is returned without authorization or beyond the prescribed time limit of the RMA (14 days), the return goods may be refused and no credit will be issued. -
Returns RMA Process
* Once MCPc receives your completed RMA request form we will notify you via email of the returns process. "Authorized return service" (ARS) labels including RMA numbers are issued via email or regular mail to speed your return. Please allow 10 days from the date of receipt of merchandise for MCPc to inspect merchandise and process your return.
* If an item is returned without authorization or beyond the prescribed time limit of the RMA (14 days), the return goods may be refused and no credit will be issued. -
Shipping
* Return products must be shipped prepaid. MCPc does not cover return shipping expenses unless the return is due to MCPc error such as over shipment, mis-shipment or sales error.
* MCPc will match customers return shipping priority with exchange or replacement items. -
Shipping Damage
* MCPc will assist our customers in handling damage claims that are the liability of shippers and vendors/manufacturers. Damaged goods notification to MCPc must be within the first 15 days of arrival. It is essential that MCPc is notified immediately of damaged goods so claims do not age beyond an actionable timeframe and we can assist with timely management between all parties involved. -
Shipping Damage Assessment Requirements
* Exterior carton damage: If the exterior package/carton is damaged by the carrier, causing damage to the contents, you MUST keep the original package/carton and then call Customer Service for a claim to be filed. If the original damaged package/carton is not available, there will be NO merchandise credit from the carrier or MCPc. Interior concealed damage: If the exterior package/carton is intact and only the interior product is damaged, you MUST keep the original package/carton and then call MCPc Customer Service for a claim to be filed.
* Damage must be noted on carriers bill of lading or drivers manifest at time of delivery to ensure claim. -
MCPC Shipping Errors
* Obtain an RMA number (above).
* MCPc strives for service excellence. We apologize for any errors caused by MCPc and will gladly take the product back, as long as you make your claims for Shipping Errors within ten (10) working days of delivery of goods.
* If the return is a result of a MCPc error, an"authorized return service" (ARS) label will be emailed or mailed to you and product will be returned at the expense of MCPc. -
Supplies: Non-Defective
* MCPc offers up to a 90 day return policy on select supply items. Sealed product returns vary by manufacturer and can be returned up to 90 days from the date merchandise receipt depending on manufacturer specific returns policies.
* Returned merchandise must be in resalable condition. 100 percent complete and unused, contain ALL original boxes and packing materials, have original UPC codes on the manufacturer boxes, contain all manuals, blank warranty cards and other accessories and documentation provided by the manufacturer. The outer package seal must not have been opened or re-taped. Product boxes that
have been opened, re-taped, written-on or labels applied are not eligible for return
* All non-defective returns are subject to a 15% restock fee (based on purchase price) for service and handling, or any higher amount charged to MCPc by the vendor -
Supplies: Defective
* MCPc offers a 30 day return policy on defective supply items. -
Hardware/Software: Non-Defective
* MCPc offers a thirty (30) day return policy, from merchandise receipt, for serialized hardware such as computers, monitors, printers, routers. etc., subject to manufacturers return policies and restrictions.
* All non-defective returns are subject to a 15% restock fee (based on purchase price) for service and handling, or any higher amount charged to MCPc by the vendor
* Returned merchandise must be in resalable condition. 100 percent complete and unused, contain ALL original boxes and packing materials, have original UPC codes on the manufacturer boxes,
contain all manuals, blank warranty cards and other accessories and documentation provided by the manufacturer. The outer package seal must not have been opened or re-taped. Product boxes that
have been opened or re-taped are not eligible for return -
Hardware/Software: Manufacturer Restrictions
* MCPc will gladly facilitate calls with you assisting in manufacturer direct situations when MCPc is unable to directly process your return.
* MCPC may not accept OEM hardware items such as PC components or peripherals for exchange, replacement or credit due to manufacturers’ restrictions. Select manufacturers such as IBM, Dell, Compaq, HP, etc. control warranties, returns, and exchange and repair policies directly for their merchandise.
* Open software, special order items and custom configured systems cannot be returned for credit.
* Orders requiring custom configuration or assembly of product to meet customer specifications are non-cancelable and non-returnable except for DOA (see DOA Policy). -
Hardware/Software: Defective/DOA
* Serialized hardware that is inoperable at first use prior to configuration is eligible for a DOA return. Defective merchandise may be returned directly to MCPc within 10 days from merchandise
receipt date depending on manufacturer policy. Certain manufacturers may require that all DOA and defective products be returned directly to them, or they may limit the return time frame after purchase
* MCPc is not obliged to replace any product that has been abused, improperly installed or otherwise misused. Not all defective or "DOA" (Dead on Arrival) hardware will be credited. Items may be
replaced or repaired in accordance with the manufacturer’s policy.
* All original packaging, components, accessories, software and manuals must be included with returned DOA or defective products. DOA and defective products returned incomplete may be assessed a charge for the missing items or returned to the customer at their expense.
* MCPc Custom Configured Hardware: MCPc reserves the right to test all computer systems or components returned as DOA or defective. Products found not to be DOA or defective will be returned to the customer at their expense.
* Manufacturer policies are subject to change without notice.
-
Submit Form
Using the online form, fill in your contact information, the number of shipping labels required*, quantity of collection bins if needed**, and the name of your MCPc sales rep. Next fill in the quantity of each core type you are returning to the recycling facility. Your core rebate will automatically be calculated. Click the submit button. -
Ship Cartridges with Prepaid labels
Your prepaid shipping labels will be sent out within two business days via U.S. mail. Each label will be marked with a corresponding order number. If you do not use all of the labels provided please discard the extras, they cannot be used for future orders***. -
Receive Rebate
Once received at our recycling facility, your cartridges will be unpacked and inspected for reuse. You will receive your recycling rebate for all qualified cartridges within four to six weeks of the receipt of your order.
* You should request one shipping label for each shipping carton or bundle of cartridges you plan to return. You may bundle up to eight individual cartridge boxes on one shipping label (150 lbs max). For best results, all shipments should be protected from potential damage while en route to our recycling facility. Broken cartridges will be assigned no value. Always try to pack cartridges in original packaging. If original boxes and inserts are not available you can use peanuts, bubble wrap or other protective material with a sturdy shipping carton.** If you only need to request collection bins and do not have cartridges to return, please email your name, address, phone number, and bin quantity to recycle@turbongroup.com. Please put “MCPc Bin Request” in the subject of your email. Bins are shipped within two business days from when the request is received.
*** Apply one label to each shipping carton or bundle of cartridges to be returned. If you have a regular UPS pickup, simply give the packages to the driver – no paperwork is necessary. You may also take your cartridges to any UPS counter drop-off location.